
> Intro
> Create
• Equipment & Nadir
— Panoramas: Equipment & Nadir —
Hardware for spherical Panoramas
Mirror Ball
A photo camera on a tripod and a fitting stand ontu which the camera can be
mounted. When I started to address panorama photography in earnest, I worked
with a DSLR DX camera fixed on a cheap tripod from a department store. A
2.5 inch (63.5 mm) diameter polished chrome steel ball was put on a microphone
stand and photographed with a tele lens from two sides.
Camera and tripod take up a large part of the reflection and therefore a second photograph from about 90° around the sphere was taken. Both photographs were combined using a mask in such a way that the camera got eliminated. Under Raytracing > 3D World the mirror ball method is covered in more detail.
Fisheye
Later, I purchased a 10.5 mm fisheye lens for the 6 Mpx DX camera; a giant
leap in quality. Not only two but seven photographs were needed: six horizontal
and one for the zenith (two would be better). The nadir can be cheated into
the panorama later or three additional shots are taken.
With the success came the wish to increase quality even more. A 24 Mpx FX DSLR was purchased. The DX lenses could still be used but if one wanted that, all the money for the FX camera would have been wasted. Hence, a 16 mm FX fisheye lens was purchased. The workflow stays the same.
Tripod In order to be able to take photographs for a high quality panorama, a panorama head on the stand is mandatory. Right at the start it was obvious that the cheap tripod from the department store was too weak to support the weight of the panorama head and the camera. The tripod had to be replaced, too — the expense for it exceeded what I had paid for the DX camera and all lenses for it. I have never regretted this purchase. For panoramas and even more for HDRI panoramas a stable stand is key. Like for backyard astronomy: invest your money for a stand, if there is some money left, buy a telecope with it.
Aligning
Before tripod, camera and lens are used the first time for shooting a
panorama, they must be aligned and adjusted one against the other. When
the camera is rotated on the tripod, the focal point of the lens must
stay at the same place and not move around in a circle, however narrow.
This means the left-right (X), forward-backward (Z) and up-down axes
must be painstakingly adjusted. This very time consuming labour must be
done once for every camera-lens combination and noted. The precision
with which this was performed determines how accurate the single shots
are stitched to a panorama.
Are camera and the nearest object modestly far away, 30 ft (10 m) or more, the exactness of the alignment is less an issue than if they are close. How precisly the gear has been aligned can be checked in a small room — make a «Claustropano».
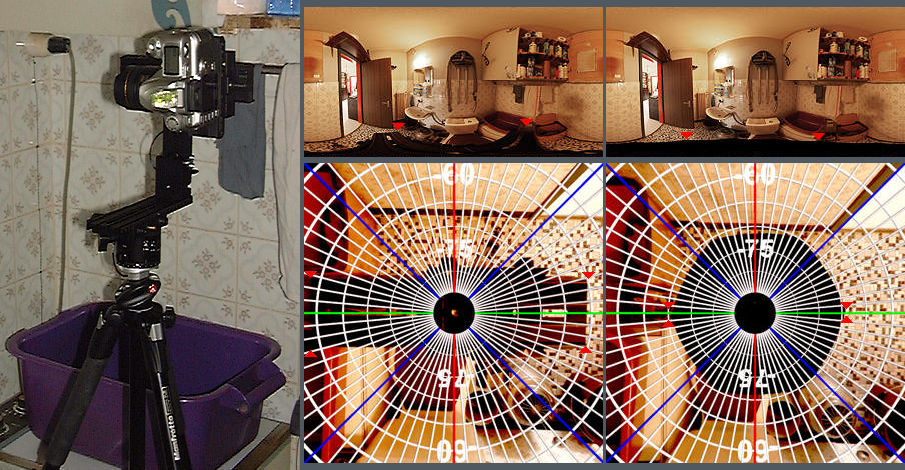
At left the camera in a tiny room, 6.5 ft (2 m) long, 4 ft (1.2 m) wide and 7.9 ft (2.4 m) high with the camera 4.9 ft (1.5 m) above the floor. The nearest wall is less than 16 inches (40 cm) from the lens. On the right side the final panoramas, once with the stand in the nadir and once without the nadir shot. The tiling on the walls and the floor were very helpful to locate stitching errors. On the first try, I found in the 8400 x 4200 px panorama a stitching error 4 pixels wide, on the second try none.
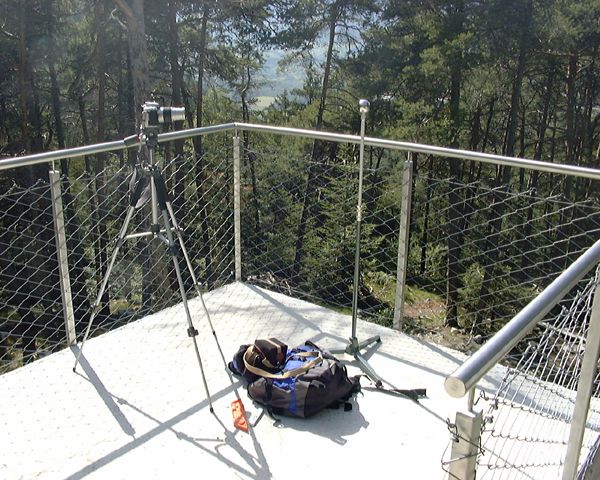
Nadir
The nadir is a challenge. Every tripod obscures the view to the ground partly; some tripods more so, others less so. Mine hides the floor very generously — on the wide side up to 60° and on the small one 30°. If the nadir is left out, a circle of about 40° remains. This is a smaller surface than what the tripod obscures. Missing or hidden parts of the nadir can be added in post using an image processing program. There are three strategies:
- Move tripod and camera and take a shot from the ground where the equipment was when the panorama shots were made, then rectify the shot and insert it.
- Copy similar parts from the surroundings of the missing nadir and fill the nadir with them.
- Put a mirror ball at the place of the nadir, not ideal but much better than a hole.
1. Additional shot
This is the most professional but also most elaborate strategy. Make a
nadir shot, rotate the camera by about 90° and take a second nadir
shot. Each photograph has unhidden parts that are hidden in the other
one. Additionally, take a shot from where the gear was when acquiring
the panorama. PTGui permits to rectify and insert such a photograph
to complete the panorama. It is quite elaborate to do it but it is
possible to insert the nadir and the panorama looks impeccable.
2. Copy parts of the environment
For tiled or other patterned floors, this will never work satisfactory.
For outdoor panoramas, setting up the equipment where there are no
regular patterns, this strategy can work nicely; streets, unpaved
path, meadow, debris, scree, snow …
To insert the nadir into a spherical panorama in such a way that the cheating cannot be seen is difficult because this part is very distorted and only visible as a narrow line. The panorama must be transformed into another projection so that the ground is not distorted. The spherical panorama can be transformed into the six faces of a cube and use the face at the bottom to insert the nadir. Finally, the cube faces are transformed back into the spherical projection.
Another option offers HDRShop: Panoramic Transformation, select Latitude/Longitude for the input and output projection and in the 3D Rotation Arbitrary Rotation dialogue set the X value to 90.0000. The resulting panorama has the nadir in the centre of the picture and it can be easily corrected.
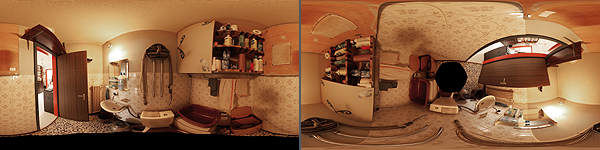
At left the panorama with the nadir as black strip on the lower edge, at right tilted and the nadir is a black spot in the centre of the image that can be filled with surrounding content. When done, the pnorama is transformed back in HDRShop with exactly the same setting, X stays 90.0000, not minus.
3. Insert a mirror ball
In an image processing program, select the black strip and note the
height of it, then invert the selection and copy it to a new image.
Vertical mirror this picture and resize only its height to what you
noted for the black strip before and leave the image width as it is.
Copy this strip and put it over the black strip in the panorama.
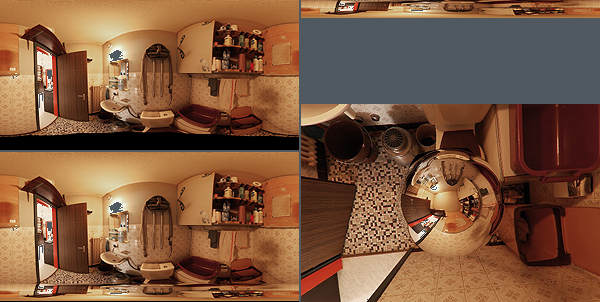
The upper left picture shows the panorama without nadir, right of it the vertically mirrored strip mde from the good part of the panorama. At lower left, the strip is inserted and at right a view from above onto the floor with the mirror ball in the nadir.
© 2004 - 2018 by Horo Wernli.